You should have received an email containing detailed instructions of how to install the SPOS 9 Onboard weather routing application. The instructions are also included below.
1. Download the SPOS Installer
- Click here to download the installer
- Start the installer and follow the instructions.
- Fill out the details from the *.txt file when prompted.
- DTN recommends using the default installation settings.
2. Start SPOS Application
- Double click on the desktop icon to start SPOS.
- When prompted, add details of your ship to create your speed/loss profile
- These details include:
- Vessel Type
- LPP
- Beam
- Design Draft
- These details include:
3. Configure settings for choosing Weather update method
- Under the Settings Menu, find the Weather Update tab
- Here you will choose a weather update method of receiving forecast data
- The 2 methods of delivery are:
- Mail
- This will allow you to automatically pull forecast updates using the Microsoft MAPI protocol.
- You will be required to have a MAPI compatible email service such as Outlook.
- HTTP
- This will allow you to download updates directly from our server.
- This is the simplest method of receiving data.
- You will be required to have an active internet connection to use this method.
- Mail
Updating the System Settings
- This will allow you to choose a folder where the data will be placed manually.
- Adding a Subscription folder will save the subscription message to this folder before manually sending this to the Subscription server: [email protected]
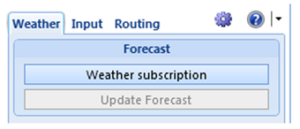
4. Activating your Weather subscription
- On the Weather tab, click on Weather Subscription
- Choose the required forecast area(s) for your current voyage.
- To add areas to the subscription box, select an area and press Add to Subscription
- You can add up to 4 areas at one time, which can be changed at any time.
- DTN recommends using 1-2 ocean areas which cover your whole voyage and 1-2 Coastal maps, adjusting them as your voyage progresses.
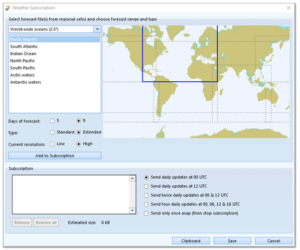
- Select the update frequency you need
- New SPOS forecasts are created every 6 hours starting at 00 UTC
- You may select 1, 2, or all 4 daily updates
- Select Save or Submit, depending on your setting
- Follow the instructions that appear on your screen
- If you selected Folder when choosing your weather update method:
- A spossub.txt fill will created in your chosen Subscription folder.
- Email this file to [email protected] to activate your subscription
- If you selected Mail when choosing your weather update method:
- SPOS will make a call to your email client using the MAPI protocol
- This will generate a draft email with your subscription information attached, including DTN’s subscription server address.
- Press send to send the email which will activate your subscription.
- If you selected HTTP when choosing your weather update method:
- After pressing Save and closing your Weather subscription menu, you will now be able to use the update forecast button and download your subscription immediately.
- If you selected Folder when choosing your weather update method:
- Once you have downloaded your forecast data, you can view the weather data on your chart by enabling the various Weather options in the Elements section
- To add areas to the subscription box, select an area and press Add to Subscription
5. Keeping your SPOS application up to date
- Under System Settings, go into Updates
- Create your update subscription
- Updated Files will be sent with your forecasts
- SPOS will also notify you when new patches are available